- Language
Network Rack Wall Mount Installation

Installing a network rack wall mount is a crucial process that requires careful planning, attention to detail, and adherence to safety standards to ensure a stable and reliable setup for network equipment. The installation process involves several key steps, from preparing the installation site to mounting the rack and organizing the equipment within it.
The first step in network rack wall mount installation is site preparation. This begins with selecting an appropriate location on the wall. The location should be easily accessible for installation, maintenance, and access to the network equipment. It should also be away from sources of moisture, extreme temperatures, and potential physical damage. Once the location is determined, the wall surface needs to be prepared. If the wall is made of drywall, it's essential to locate the wall studs, as they provide the necessary support for the rack. Stud finders can be used to accurately identify the position of the studs. For concrete or brick walls, appropriate anchors will be required to secure the rack.
After site preparation, the next step is assembling the mounting brackets. Most network rack wall mounts come with adjustable mounting brackets that need to be assembled according to the manufacturer's instructions. The brackets are designed to fit the specific dimensions of the rack and the wall studs or anchors. It's important to ensure that the brackets are assembled correctly and tightened securely to prevent any instability during the rack installation.
Once the brackets are ready, the rack can be mounted on the wall. Carefully lift the rack and position it on the brackets, aligning the pre - drilled holes on the rack with the holes on the brackets. Insert the appropriate screws or bolts through the holes and tighten them gradually and evenly. It's crucial to ensure that the rack is level during the installation process. A spirit level can be used to check the horizontal and vertical alignment of the rack. If the rack is not level, it can cause instability and make it difficult to install and operate the network equipment.
After the rack is securely mounted, the next step is to install the network equipment. Start by planning the layout of the equipment within the rack, considering factors such as heat dissipation, cable management, and ease of access. Install heavier devices, such as servers and power distribution units, at the bottom of the rack for better stability. Use the appropriate mounting hardware, such as screws and rails, to secure the devices to the rack. As each device is installed, ensure that all the connections, including power cables, network cables, and any additional cables, are properly made and organized.
Cable management is an integral part of network rack wall mount installation. Use cable management tools, such as cable ties, cable trays, and cable organizers, to keep the cables neat and organized. Route the cables through the designated cable management channels on the rack, ensuring that they are not twisted, kinked, or under excessive tension. This not only improves the aesthetics of the installation but also reduces the risk of cable damage and makes it easier to identify and troubleshoot any cable - related issues.
Finally, after all the equipment is installed and the cables are organized, perform a final inspection. Check that all the connections are secure, the rack is stable, and the equipment is functioning properly. Make any necessary adjustments or corrections. By following these steps carefully, network professionals can ensure a successful and reliable network rack wall mount installation, providing a stable foundation for the network infrastructure.
Read recommendations:
LEG 77253 Multi-support Triple Socket Mosaic - 3 x 2P+E Automatic Terminals German Standard White
-
-
-
-
-
-
-
-

-
-

Network Patch Cord Cat8
Oct 23, 202592
-
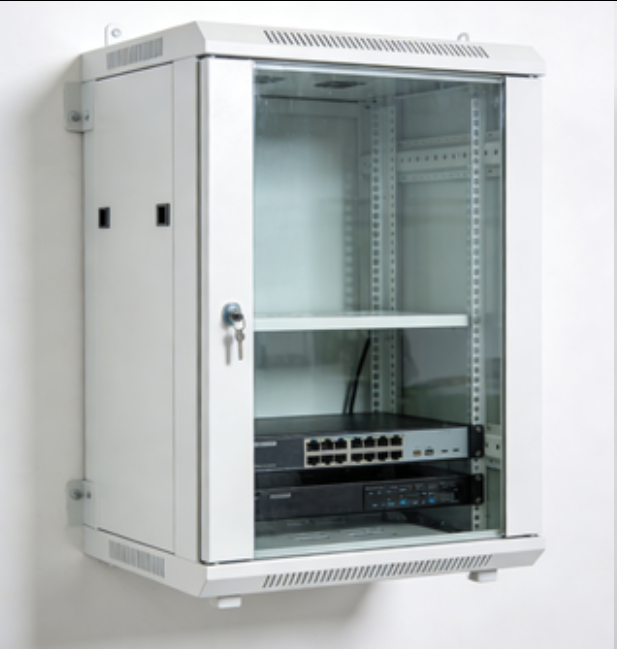
Network Rack Wall Mount with Glass Door
Jan 07, 202677
-
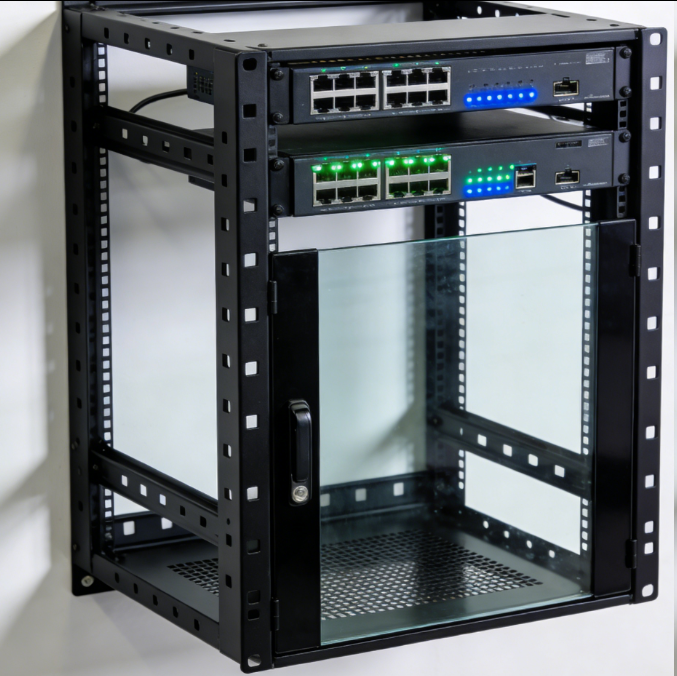
Network Rack Wall Mount 9U
Jan 06, 202675
-

Network Cable Management Tray
Oct 30, 202573
-
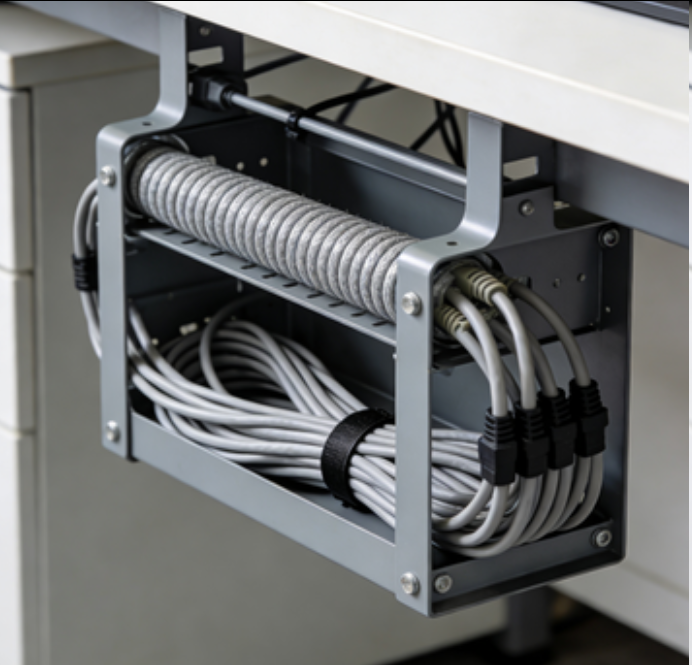
Network Cable Management Under Desk
Dec 25, 202572